
A LED Halo is an arch that goes over your work area that has light emitting diodes, more commonly referred to as LED, affixed to the bottom of it. I originally saw one several months ago. It was said to eliminate shadows on the model that you are painting. Now as a painter, I know how helpful this can be as it eliminates the need to twist a model around as well as allows better shadows to be painted on the model itself. This tutorial could be useful for sewing, tattoos, or anything that requires good lighting.

A couple of weeks ago, Mathieu Fontaine, multiple Golden Daemon winner, put up his new light halo and the Internet miniature painting community was abuzz! Many people asked: where you can buy one? How is it made? What do you need? So I decided to educate myself on the art of LEDs and then build one of these and share the plans here!

In this article I will cover the supplies, different types of LEDs, different options you may have and of course anything interesting that I may find around the Internet. Now this is part 1 of a 2 part article. In the second part we will cover ordering the supplies and actually putting it together.
While researching, I discovered there are only four basic components that go into building one.
- The strip of LEDs, this is what will provide the light.
- Transformer, this is the power supply, what gives the power to the lights.
- The Arch, a flat, but flexible material to attach the lights to.
- Hardware: various drills, screws, glue, nuts, and bolts.
Optional
- Dimmer: this goes between the transformer and LEDs allowing you to dim the lights if you like.
The first thing I looked into was the LEDs as everything else would honestly be based on the type of LEDs picked. Here are a few things I discovered while researching LEDs.
- Color:
- LEDs come in all types of colors, as well as color changing.
- There are many types of white.
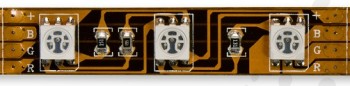
- Size: all of the LED strips I looked at had a four digit number like 5050 to signifying size. The three most common are 5050, 3014, and 3528. The two numbers are the size, height and with. Example a 5050 is 5.0mm by 5.0mm.
- Number of LED per meter. The higher the number, the brighter it will be, but more power will be consumed as well.
- Power Requirements:
- 12v of your work area is over 8ft 3 inches or under, a 12v system should be fine.
- 24v if you are work surface is 8ft 4in or greater you will want to use a 24v system.
- Lumen: Bigger the number, the brighter it is.
- Waterproof: how much protection the lights have from water or moisture.
- Ability to be Cut

So now that we have figured out all of the different types of options we can get for strip lighting, I decides that I wanted:
- A white only diode to maximize light output.
- Sized at 5050 with 60 LED per meter; this will provide the most lumens of most set ups. You can get a 3528 set up with 240 LED per meter but that’s a lot of power.
- A 12v system. I decided to go with a 12v system since the LED and transformer are cheaper and use less electricity. If you are going to run more than a 4m length in one line (in series, a work space of 8ft 4in or greater) you will want to consider a 24v system.
- I ordered both waterproof and non-waterproof lights but plan on sealing them.
- A color temperature of 6000k, that’s as close to pure white as I’ve seen in LED without buying super expensive strips of lights.


For the transformer I picked up a 12v 3a 36watt transformer. Not the smallest one on the market and more than we need, but at a price difference of a $1, well worth the upgrade. Rule of thumb is more LED you have, the more wattage you need. I will include the formula below if you’re planning on going nuts and placing more than one or two strips.

For a dimmer you need to decide if you want it before or after the 12v transformer. I picked up one that goes in after the transformer. Now remember this is totally optional and can be added in later too. If you decide to go with a 24v system, please order a 24v dimmer.
I’m still hunting for the perfect arch material and will cover that in part 2 when we build this beast. I’m going to need to make a quick trip to the hardware store anyways for some hardware to mount this.
To build what I am building you can order these items from Amazon!
LED (I ordered 2 types to test)
3825 5m Roll: http://amzn.to/1PQ0yiH
5050 5m Roll: http://amzn.to/1ON4YJq
Power Transformer:
Extra Connectors:
Dimmer Switch:
http://amzn.to/1PQ2zLV
I hope you have found this to be helpful, please explore the rest of the website as we have many great tutorials like this posted. If you enjoy a bit of R rated humor and learning about numerous topics about painting and the hobby in general we have a podcast, Models Workshop After Hours, that you can find on iTunes as well as all major podcatchers for Android, you can also listen to it at modelsworkshop.libsyn.com.
If you have a topic you would like to see on the website or hear about on the podcast please feel free to email us at ModelsWorkshopPodcast at gmail.com or head over to www.facebook.com/TheModelsWorkshop.
We can’t do what we do without listeners and viewers like you. If you would like to support us, please consider giving a one-time donation though by clicking below
or a small monthly donation through www.patreon.com/ModelsWorkshop where every penny goes into adding great content for people like you.
All items that I talked about in this article are things that I personally posted. The roll of 3528 led lights were donated by a user. We were not paid to say what we did.
Sources
Fero LED
http://feroled.com/how-to-choose-flexible-led-strip-lights/
Flex Fire LED
http://www.flexfireleds.com/pages/Comparison-between-3528-LEDs-and-5050-LEDs.html