

Hello all, last week I posted part 1 of this article where I talked about wanting to build a light arch. Thinking it was going to be expensive I put it off until Mathieu Fontaine posted his up and it inspired me to get to researching what exactly was going to be needed. Needless to say I was pleased at how cheap it actually was. So I put an order in with Amazon and this week we are going to get into the building of the Light Arch.
You are going to need the following:
(the links below are links to our affiliate store and help support Models Workshop)
- LED (Highly recommend the 5050 or higher) These LED strands are able to be cut with various splinters including straight, L-shaped, T-shaped, and X-shaped, see optional section.
- 3825 5m/16.4 ft Roll
- 5050 5m/16.4 ft Roll
- 5630 Ultra Brite 5n/16.4 ft Roll (these do not come with a barrel connector, you can order a barrel connector here)
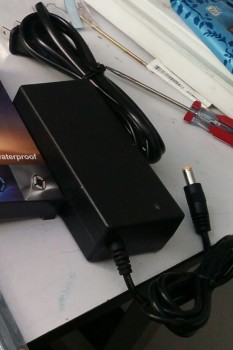
- Power Supply
- Power Transformer 36W 3A
- Will power up to 15ft
- Power Transformer 72W 6A
- Will power up to 30ft
- Power Transformer 360W 30A
- Will power up to 150ft
- this is for advanced users
- Power Transformer 36W 3A
- Arch Material
- Low Heat Hot Glue Gun with Sticks
- Zip Ties
- Heavy-Duty Fastener (Velcro)
Optional items
- Dimmer Switch (Highly Recommended)
- Extra Connectors
- Soldering Iron
- Hacksaw
- L-shaped connectors
- T-shaped connectors
- X-shaped connectors
- Extension connectors
- Y-Shaped Power Splitter (required in some builds)
Note: if shopping for connectors, you will want 10mm wide, 2pin/single color
Note: for the arch material, I wouldn’t use the link above unless you are a good distance from a hardware store, I only paid a bit over $5 for 5ft Termination Bars, they want $13.

Grab a free 30 day Prime membership and get free 2 day shipping on all of the stuff you order to make your Light Arch as well as thousands of tunes to rovk out to while building it!
Section 1: Planning
For this you will need to go measure the area you’re planning on putting the Arch over. Below is the minimum shopping list of what you will need to buy from the links above. I tried to do as much of the research for you as I could.
For 5050
If it’s 3ft or under:
2x 5ft Termination Bars, 1x 36W 3A (minimun) Power Transformer, 1x Package of 5050 LED, 1x Dimmer Switch
If it’s 3ft 1in to 4ft 9in:
2x 10ft Termination Bar, 1x 32w 3a Power Transformer, 1x Package of 5050 LED, and 1 Dimmer Switch
If it’s 4ft 10in to 6ft:
2x 10ft Termination Bar, 1x 72w 6a Power Transformer, 2x packages of 5050 LED, 1 Dimmer Switch, and 1 Y-shaped power splitter.
For 5630
These are higher power consumption (a lot higher) so pay attention to the power transformer.
If it’s 3ft or under:
2x 5ft Termination Bars, 1x 72W 6A (minimun) Power Transformer, 1x Package of 5630 LED, 1x Dimmer Switch
If it’s 3ft 1in to 4ft 9in:
2x 10ft Termination Bar, 1x 72w 6a Power Transformer, 1x Package of 5630 LED, and 1 Dimmer Switch
If it’s 4ft 10in to 6ft:
2x 10ft Termination Bar, 2x 72w 6a Power Transformer, 2x packages of 5630 LED, and 2 Dimmer Switch
(Yes you have to run 2 power transformers if you want plug and play. Otherwise you will have to cut wire, and splice on a more advanced power supply)
Section 2: The Arch
The hardest part of this entire project was the arch itself. Finding a material that is both flexible enough to bend, but rigid enough to stand on its own was a bit of a chore. Two versions of the arch was built. The first one way made of vinyl and wouldn’t support itself, I eventually made it work by hot gluing a wire hangar to it, but it was ugly unprofessional looking.

After a quick trip to Menards followed by a long walk I found roofing Termination Bars. I found these at Menards for $5.29 for 5 foot bars and $7.99 for 10 foot bars.

If your desk is 3 feet or less a 5ft bar will do. If your desk is between 3ft and 6ft you want the 10ft bar. If you want a single arch buy one, double arch buy two. I highly recommend a double arch for two main reasons, stability and the extra light. The $5 to $7 you save by not getting the second bar will be spent in frustration and parts to secure it properly.
I have also seen a couple nice arches with people using vinyl window trim. With vinyl you have to make sure it’s pretty rigid otherwise it has a tendency of just flopping over.
- 3ft table need 5′ bars
- 3.5ft table need 5’10” bars
- 4ft table need 6’7″ bars
- 4.5ft table need 7’7″ bars
- 5.0 ft table need 8’5″ bars
- 5.5ft table need 9’3″ bars
- 6ft table need 10′ bars
The above measurements include extra to make the mounts.
Keep on mind the larger the arch, farther from the surface the lights are going to be. At 3 feet your painting sweet spot will be 1.5 feet or less from the lights, while at 6 feet you’re looking 3 feet of so. You can lower the peak of the arch by making the arch more of an oval shape. Alternately you can also do a surface mount on a larger table (see Section 3).
Warning: You do not want to attach the lights yet. LED strips are not all that flexible and are fragile. You can damage them by attaching before bending the arch.
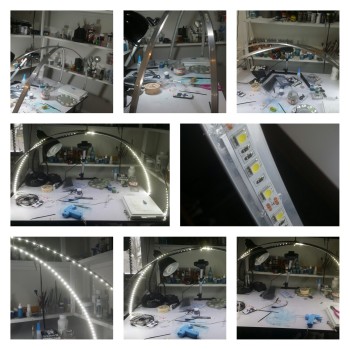
To prepare the arches I had to slowly bend them into the curved shape you see. I did this by slowly working around down the bar about an inch at a time and bending them with a breaking motion similar to what you would use to break spaghetti. You want the lip facing down.
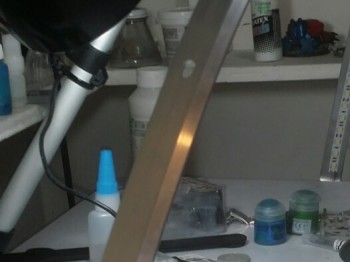
If you don’t have the hand strength to bend the bar you can use a counter top. Place a towel on the surface and with one hand brace the bar and slowly deed it out while with your other hand you press down and bend the bar. If you still can’t do this, invite a chubby dude like myself over with cupcakes and ask them to.
If they are a bit over or under bent, no problem you can flex them tighter or lossen it up pretty easy. The most important part is they are even and the curve is constant.
Warning: if you bar has holes it will try to bend more there then on the regular bar, you’ll have to be careful.
I highly recommend going with a double bar system. The stability it adds is easily worth the extra $5 for the second bar. If not you will have to brace the arch on your desk to make sure it does not collapse.
I used a double arch that crosses over each other. I lined up the middle hole and ran a bolt threw it, added a nut, then added the second bar. The nut it to allow enough space for the LED strand to run on the bar.

Tip: If yours doesn’t have holes or they are in the wrong place you can either secure it with tape or hot glue. You can do this step after you get it attached to the desk or after you run the lights.
Section 3: Mounting It
On mine, since I have a 3ft desk and only needed a 4’8″ bar and had 5′, I took 2 inches on each side and bent them inward. If you bend them in you will want to bend them slightly past 90 degrees, if you’re bending them out, it will be slightly less then 90 degrees.
Now there were issues with this as the created feet are at a slight angle. Nothing noticeable as the velcro held it secure even with an under desk mount. The way I bent them was with an adjustable pipe wrench. You can also use a vice, or lacking that stepping on it and bending it up carefully to not warp the entire bar.

If you have access to a vice you could correct the issue with a clamp and twist. Alternating you could leave the bars flat and velcro or screw mount the bar on the side to.
Types of Mounting
- With feet mounted under. To me this is the neatest mount as the feet are hidden away and the bars appear to rise out of the side of the desk.
- Side mount. The bars are kept straight or curved and the velcro is added to the side of the desk with velcro or screws.
- With feet surface mount. This is good if you have a larger desk and only want to use part of it for the arch. Create the feet by bending the last 2 inches like normal but put the velcro on the bottom. You also don’t have to bend the feet in either, they can also be bent out.

Section 4: Adding the Lights
Now you have the arches up and the bars secured to your desk it’s time to add the LED light strips.

1. Take a lint free cloth and some alcohol and clean the inner, desk side, surface this will remove any oil that may have been on the surface of the bars while we bent them into place.
2. The first thing you will want to do is secure the end of the LED strand to the bottom of the corner closest to the power source as you will need to plug in the power transformer. You’ll do this by using a zip tie at the very bottom.
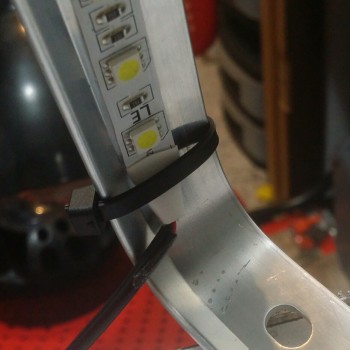
3. Now it’s time to start running the LED lights. The one in the shopping list above from LE have glue on them already, you need to peel the backing off and slowly apply it to the bar. As I planned on only running a single strand per bar I placed it right in the middle. If you want to run a double strand for more light you will have to place the first on the edge to leave space. There will be a small dip where the lights go over the middle. Once you reach the end of the bar, put on another zip tie to secure it.
Warning: as you’re applying the LED, be careful as they can be broken easily by applying to much pressure directly to the light.
Warning: do not apply the lights while they are on or even plugged in. While the voltage is low, you can still be hurt by it.
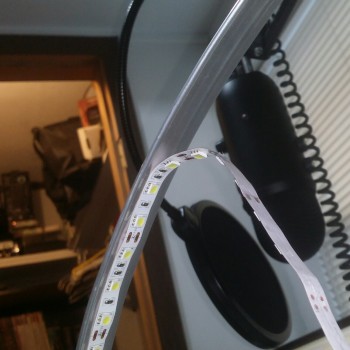
4. Switching to the second bar. There are several methods that I have figured out, and I’m sure more.
- What I did was loop the strand under my desk until I could curve it up and around back onto the second bar. Yes this means there are random LED mounted under my desk but it also means there is light under my desk. Eventually I will order some T splinters to not only make it neater but also add more lights.
- Each box of LEDS also come with 2 splitter connectors. You can use these to connect the two strands with a 14 or 16 Guage and soldering the wire to the connector. I tried to do this without solder but the wires didn’t get a good enough connection.

- Like I mentioned above you can use L-shaped connectors to make it neater.
- You can also use a Y splitter at the power source to put a power plug on each strip. If you are using over 15ft on a single stand (working area is over 4’9″) this will be required)
Now that all the strands are done you will want to reinforce the bond of the strips to the bar. The Glue that’s on the LED strips is good for positioning, but once you have the power on the lights for a while and they heat up, it begins to unstick and they droop a little. What I did was on every cut mark, about 2 inches I applied hot glue across from the bar, over the strip, to the other side. You can do it more often if you like but this seemed reasonable to me.
Section 5: Power
Of you are not using a Y splitter plug then this is incredibly straight forward. Plug the barrel connector from the strand into the dimmer, plug the dimmer into the power brick.
If you decided on using a Y-splitter you will want to hook the lights up to a splitter, then the splitter to the dimmer, then to the power brick.
Now plug it in!
Any corrections or alternate ideas you may have please message us at http://www.facebook.com/TheModelsWorkshop or emails us at Modelsworkshoppodcast@gmail.com

From John M
I recently built mine, for the arch get a piece of PVC moulding/trim 3/4″x1/4″x 8′ from Home Depot cut in half makes a nice arch. Then get a 4 small 90* angles to mount desk. You may want to order the extension clips to connect the 2 arcs otherwise you will need to solder wire to the strips.

It’s a piece of plastic trim left over from fitting double glazed windows.
From Mark T.
I hope you have found this to be helpful, please explore the rest of the website as we have many great tutorials like this posted. Please keep in mind that tutorials like this one can be expensive to make and very time consuming. Any help is greatly appreciated and will go towards the next great tutorial.
If you have a topic you would like to see on the website or hear about on the podcast please feel free to email us at ModelsWorkshopPodcast at gmail.com or head over to www.facebook.com/TheModelsWorkshop.
We can’t do what we do without listeners and viewers like you. If you would like to support us, please consider giving a one-time donation though by clicking below
or a small monthly donation through www.patreon.com/ModelsWorkshop where every penny goes into adding great content like this for people like you.
All items that I talked about in this article are things that I use and highly recommend. None of these items were donated or were we paid to say what we did.
If you enjoy a bit of R rated humor and learning about numerous topics about painting and the hobby in general we have a podcast, Models Workshop After Hours, that you can find on iTunes as well as all major podcatchers for Android, you can also listen to it at modelsworkshop.libsyn.com.